
Git is an amazing tool with worldwide use! Being a tool we use daily, as developers, it’s a real pleasure being able to see how it works internally. And since Git is a free and open source project, we can do that! Even more, we can join the community and contribute to further improve this great software :) That’s what we’ll talk about in this [not so] brief post.
Index
- 0) Glossary
- 1) Community
- 2) Downloading the Source
- 3) Overview of the Repository
- 4) Compiling, Installing and Running Tests
- 5) Submitting Patches
- 6) Where to Contribute
- 7) Some Extra Tips
- 8) Extra References
0) Glossary ↩
There’re some words we’ll see a lot throughout this post, so let’s stop for a minute to recap their meanings. If you’re already comfortable with them, please, feel free to skip this section.
- Patch: A patch is a file containing a collection of changes to a given code. When we talk about patches, in this post, we are in fact talking about “source code patches”. This subset comprehends the set of textual patches which can be applied over source code. They are usually a “diff” containing the “additions” and “removals” of code lines. (You may think of a patch as a diff between two commits in a row).
- Patchset or series: a set of patches that usually refer to the same thematic. Although each patch has its own set of changes, the patchset usually has a common goal and there may be dependencies between a patch and its “parent”.
- Review: a series of comments and suggestions on a patch, to help improve its quality.
- Patch version: the patch’s current iteration. It’s very common for a patch not to be merged in its first version. So after getting reviews and fixing what is needed, the author will send a “v2” (version 2). This process may repeat for some iterations (v3, v4, etc.).
1) Community ↩
The Git community communicates mainly through:
- The Git mailing list
- IRC, in channel #git-devel at freenode.org
Mailing List
In order to subscribe to the
mailing list, you have to send an email with no subject to
majordomo@vger.kernel.org containing subscribe git at the body. Then wait
for a follow-up email from majordomo, which will give the next instructions.
Basically, you’ll receive an authentication token that must be sent back to
confirm subscription. Finally, if everything goes well, you will receive a
welcome message from majordomo :)
Note: All messages to majordomo (and to the mailing list) must be sent in ‘plain text’ mode, without HTML code. In Gmail, you can enable this mode in the tree dots icon when writing an email. Regarding posting style, the preferred method is the inline reply.
What’s Cooking
The maintainer frequently sends a “What’s Cooking” message containing
information about each topic branch he’s holding and how they are evolving in
the workflow (more on that later). It’s always good to keep an eye on these
emails to check on updates. If you are working on a new version of a patch which
is marked as “Will be merged into
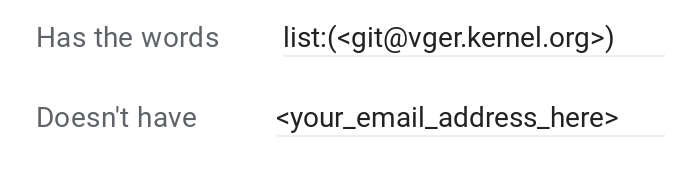
Filters
As the volume of messages is quite high, you may also use a combination of
filter and label in your mail server to keep the list messages separated from
your main inbox. In Gmail, you can create a git label and use the following
filter and action options:

Archives and referencing emails
The mailing list also has some archives, which are very handy when looking for specific topics (or conversations that happened before you subscribed). Links to the archive are also quite often used as references when talking about a specific mail thread. Here are some public archives:
When referencing an email, the community usually opts for the first archive. It
uses Message-IDs as identifiers in
URLs, which makes it quite easy to use as a reference. (As we’ll see latter, you
may use --in-reply-to=<Message-ID> of git-format-patch and git-send-email
to send a reply to a specific email). Besides that, public-inbox has some really
nice filtering options.
Patchwork
There’s a patchwork instance at kernel.org that also tracks all the patches sent to the Git mailing list. You can check it here. It’s a nice way to list patches and their series.
IRC
If you have never used IRC (or perhaps wants to refresh your knowledge of it), FLUSP has a nice tutorial on how to chat on IRC with weechat.
There’re two channels, both at irc.freenode.net:
#git: for questions on how to use Git. There’s a log here.#git-devel: for Git development discussions. There’s a log here.
Part of the community also gets together at IRC every other Monday at 17:00 UTC for a virtual standup meeting. All are welcome to join in :) To avoid missing the dates, you might want to subscribe to the Git Events calendar.
Calendar
Talking about calendars, we also have the public Git calendar where it’s possible to check the development phases for each Git version.
2) Downloading the Source ↩
Git’s source code is available at https://git.kernel.org/pub/scm/git/git.git/.
There are also some alternative mirrors at:
- https://kernel.googlesource.com/pub/scm/git/git
- http://repo.or.cz/w/alt-git.git
- https://github.com/git/git
You may also want to check Junio’s (the maintainer) fork at GitHub. There you’ll not only find the main integration branches but also individual topic branches being cooked: https://github.com/gitster/git/.
To get familiar with the branches workflow, you can read the man gitworkflows
page.
Some sections of the system have dedicated maintainers with their own repositories. If you wish to contribute to these sections, your work must be based on their trees. These sections are:
- ‘git-gui/’, maintained by Pratyush Yadav: https://github.com/prati0100/git-gui/
- ‘gitk-git/’, maintained by Paul Mackerras: clone from git://ozlabs.org/~paulus/gitk
- ‘po/’, maintained by Jiang Xin: https://github.com/git-l10n/git-po/. Note that you can also contribute with translation through weblate.
3) Overview of the Repository ↩
Git is mostly written in C, but there are also some perl and shell scripts.
You’ll see that each command, in general, has its own command.c,
command.perl or command.sh file. However, that’s not always true. For
example, the git status’s entry function, cmd_status (another pattern), is
at builtin/commit.c.
Tip: Take some time to browse the code and inspect the implementation for some of the commands you use daily. It’s really fun! You can check, for example:
Git’s main function atcommon-main.c- Some commands’ entry functions (usually
cmd_*) - The way Git declares options (the
struct optionarrays for each command)
The t directory is where the tests reside. We’ll talk more about them later,
but it’s important to highlight the t/README file. That’s were the test lib,
test structure and execution options are described.
The Documentation directory is a very precious information container. There
you will find, for example:
- many
git-*.txtfiles, which becomes the Git manpages; - the
technicaldir, containing nice descriptions of APIs and protocols; - the
howtodir, containing tutorial-like articles for both users and contributors.
How-to-contribute documentation
The Documentation dir also holds some very important files on the
contributing process. Make sure to read these before sending your first
patch.
SubmittingPatches: contains a lot of useful information on the contributing process. Here is the HTML version.CodingGuidelines: describes the coding style used by the community.MyFirstContribution: a great tutorial on how to start contributing to Git. It helps better understand the code flow, by walking the reader through the process of creating a new Git command! Here is the HTML version.
4) Compiling, Installing and Running Tests ↩
Compiling
To compile, run make -j<num_threads>, replacing <num_threads> by the
desired number of threads.
Note: You may need to install some additional dependencies. But if compilation fails, you can check what you need to install by the error messages.
config.mak
This file is ignored by Git and should be used to enable custom compilation
options. It is automatically included by the Makefile.
One thing you may want to do at this file is setting the DEVELOPER knob. This
will enable the most important compilation warnings Git community cares about.
To do so, simply add DEVELOPER=1 to your config.mak.
The config.mak file is also very useful when you want to compile Git to run it
through GDB or Valgrind. For example, you may use:
LDFLAGS += -g3 -O0
CFLAGS += -g3 -O0
Installing
Normally, to install Git in your ~/bin directory, you can simply run make
install.
If you want to do a global install, run:
make prefix=/usr all doc info # as yourself
make prefix=/usr install install-doc install-html install-info # as root
Warn: be sure to carefully read the INSTALL file for more information.
Testing
Tests are under the t/ directory, and you can run them by cd-ing to the
directory and invoking make, to run all tests, or ./<test_file>.sh to run a
specific test file.
When debugging a test you may run it with -v -d -x (check t/README for
individual descriptions) and get more information on the test execution. Also,
the directory created to run the test (something like trash
directory.tXXXX-YYY.sh) won’t be deleted even if there’re no fails so that you
can inspect it after the test is finished.
Since Git tests output TAP, it’s possible to run
them with any TAP harness such as prove. Please, read t/README for more
information on this.
Travis-CI
There’s a .travis.yml file which, in combination with some scripts in ci/,
enables Travis-CI testing for Git’s repository. As running all tests can take
quite some time and Travis-CI gives support to some additional tests (running on
both Linux and macOS, for example), it’s a nice option to test your patches.
To set it up, just fork Git’s code in GitHub, sign in to Travis
and enable builds for Git. Every time you push changes, a build will be
triggered!
5) Submitting Patches ↩
First of all, it’s important to know what branch to base your work on. You
should read Documentation/SubmittingPatches to know more about it (and other
important information). If you are not used to Git’s branches division and
workflow, you might also run git help workflows to read more about it. Also,
don’t forget to check Documentation/CodingGuidelines, for the used coding
style. This is taken very seriously.
Commit message
Your work should be divided into separate commits for logically separated
changes. And for each commit, try to describe the changes with a meaningful
message. There’s plenty of information about this at
Documentation/SubmittingPatches. This post
on how to write good commit messages is a nice reference as well. And finally,
it’s also a good practice to run git log --no-merges for some real examples.
Tip: Don’t underestimate writing commit messages. It’s a very important section of the process.
You can use tags in your commit message. The S-o-B (Signed-off-by) is a
required one. But you can also use
Helped-by, Co-authored-by, Suggested-by, Reported-by, Original-patch-by, and
others. Again, take a look on their uses running a git log at the repository.
(I also plan to do a separate post about them, soonish)
How to send
After you have completed all of the above steps and verified the patches’ correctness (compiling the code without warnings and successfully running the test suite), it’s time to submit your contribution. As you might have already noticed, the patch submission and revision process happens in the mailing list itself (remember, GitHub and Gitlab didn’t even exist when Git was first released).
Does that mean we need to manually format the patch, copy and paste it into the email client and send it? Well, you can do that. But be careful as some clients may mess up with tabs and/or add HTML tags, corrupting your patch! Therefore, unless you are sure that your email client won’t cause you problems, it’s better to avoid this approach…
So what can we do, then? Hmm, it would be great to have a program that takes a
commit from a local repository, formats it and automatically sends it to the
list, right? Oh, wait… we have such a program! Git! haha You can use
git-send-email to do that. Here’s a tutorial
on how to configure and use it. In general, you will probably use something like
this:
git send-email \
     --annotate \ # open in editor before sending
     --cover-letter \ # add a cover letter (only for series, i.e. >1 patch)
     --thread --no-chain-reply-to \ # controls mail threading
     --to="git@vger.kernel.org" --cc-cmd="contrib/contacts/git-contacts" \ # to and cc
     -v2 --in-reply-to="<MESSAGE-ID-HERE>" \ # sending a v2 as reply to your v1's cover-letter
     -2 # number of patches
(You can check more about the command added to --cc-cmd in this example at
contrib/contacts/git-contacts.txt.)
Alternatively, you may also use GitGitGadget, which makes the connection between Pull Requests and the mailing list :) Here is more information on this.
Reviews
After some days you will probably receive some comments on your patch. You might
also want to see if it has already been queued to a topic branch in
the maintainer’s fork. (you’re looking for a
branch named xy/topic-of-this-patchset where xy is the contributor’s
namespace, usually your initials). If that’s the case, keep following the
“What’s cooking” messages to see the status of your patch. And reply to the
maintainer if you’ll be sending a new version of a patch marked to be merged
into next, so that he can postpone merging it.
Sending a new version
If you received reviews, do not forget to thank the reviewers and reply to
their comments. It’s a good idea to reply them individually so that reviewers
know what you are doing in v2. You may also suggest other ways to address the
raised points, but it’s important to be opened to other’s suggestions as well :)
Then, you can make the necessary modifications using git rebase -i and editing
each commit individually.
Info: In theory, you could add a new commit for each necessary fix in your v1. But since the patches haven’t been merged yet, it’s much better to send a corrected version of them than a series containing a patch with a mistake followed by another one fixing it.
When the new version is ready, you should send it as you did before. This
time, though, you should add the v2 flag (you can use git send-email -v2 for
that) and send it in reply to your v1’s cover letter. To do that, get the cover
letter’s Message-ID in the public-inbox and
give it to the --in-reply-to option of git-send-email. This is important as
the history of the patchset is kept together. Oh, and for a single patch you may
send the new version in reply to the patch itself (as there will be no cover
letter).
Tip: Develop each patchset version in a different branch. With that, you
can use git diff <branch-v1> <branch-v2> to quickly check your changes and use
git-send-email’s --range-diff option to send a version changelog with your
patch(es). (Check more about it in git-format-patch’s man page.)
I didn’t get replies
If you didn’t get replies and your patch wasn’t queued yet, be patient and give it a couple more days. The other developers are also working on their tasks and may not have had time to see your patch yet. Also, check the calendar if a new release is approaching. In these periods new features that are not yet ready for the upcoming release are likely to get less attention, as they are not as urgent. However, if that’s not the case and there are still no replies in a few weeks, you may resubmit the patch with the tag “RESEND PATCH” or just incrementing the version and commenting it in the cover letter. But again, be patient :)
Some more tips on patch sending
Here are some extra tips on patch sending. The flags you’ll see refer to
git-send-email and git-format-patch:
- Comments section: There’s a “comments section” in each patch. The lines
added between the three-dash line (
---) and the beginning of the diff will be excluded when applying the patch. So you may use this space to add any additional information that you don’t want to be saved in the commit message. (Such as questions, simple comments or changelogs) - RFC and WIP: If your patch (or patchset) is not finished yet but it’s
almost there and you want some comments from the community, you may use the
[RFC]and/or[WIP]tag. Respectively, they mean “request for comments” and “work in progress”. Usually, we use[RFC PATCH]for a patch pretty close to conclusion and[RFC WIP PATCH]for an even cruder version. (You can set them using--subject-prefix="RFC PATCH", for example) - git-send-email options:
git-send-emailaccepts many options fromgit-format-patchas well. Thus, when you don’t find a flag in the former’s man page, try looking for it in the latter’s one. - Area prefix: it’s very common to use an “area” prefix in the commits’
titles. For example, if you are factoring out a function at
config.c, your commit title may beconfig: factor out obj reading from write_commit(). (If you’re not sure about the prefix to use, rungit log --no-merges <file>, in the file you changed, for some real examples.) Also, do not confuse this with the RFC and WIP tags. While these tags are not kept in the commit message, the area prefix is. -
Version changelogs: It’s a good idea to include changelogs between versions so that reviewers may quickly see what has changed. You can add them to the cover letter or in the comments section of each individual patch. The format can be something like this:
  Changes since v3:
  - Replaced git_inflate() call for git_inflate_gently()
  - Fixed typo on git_inflate() documentation
You can also use
--range-diffagainst the older version.
6) Where to Contribute ↩
For starters, I really like the following advice from Peff:
Scratch your own itch. Surely git doesn’t do something that you wish it did. Or did it faster. Or whatever. Try to dig up past discussions on the list to make sure you’re not doing something that has already been tried and rejected, and then start hacking.
Read the [mailing] list. People will report bugs. Try reproducing them, bisecting them, creating minimal test cases, narrowing the issues down to certain configurations or a certain bit of code, etc. Sometimes that will lead you to propose a solution. Sometimes you’ll just add to the discussion, and then somebody with more familiarity can pick up the topic from there. But you’ll have helped them by doing some of the work, and you’ll have learned more about how git works.
And here are some extra ideas to help you get started:
-
GSoC Microprojects: Git usually participates in Google Summer of Code. As a preparation/exercise for applicants, the community strongly recommend them to submit a small code-related project as part of their application. You may take a look in the microprojects from the last years to see if there’s something you can contribute to. (Note: the link refers to 2019 microprojects list but feel free to check links from other years as well)
-
Search for
#leftoverbitsin the mailing list. Here and here are some examples. -
Look for some tags in the code:
FIXME,TODO,NEEDSWORK, andBUG(not to be confused with theBUG()macro). You can search them with agit grep NEEDSWORK, for example. -
Emphasizing, keep an eye on the mailing list. There’re often discussions on feature requests, bug reports, etc. It’s also a good idea to read other people’s patches to keep up with the overall development process. This might as well ring a bell on other contributions you can work on :) And speaking of mailing lists, you may also want to check the users mailing list once in a while.
- Git community don’t have an official issue tracker (as already said, the list
also serves this purpose, being used to report and discuss bugs). But there’re
some other places where people have been filling and tracking bugs/issues:
And if you are working on Git-for-Windows, you can check its issue tracker here. You may also find general Git issues there as well.
-
Look GSoC/Outreachy project ideas from the past years that weren’t selected. Although they probably require much more work than what’s suitable for a first contribution, you might try selecting subtasks from them. Here is Git’s list of project ideas for GSoC 2019, for example.
-
Junio’s blog has a list of leftover-bits. (Check if the issue isn’t solved yet. You may also talk about it in the mailing list.)
- Finally, you may check these three pages containing project ideas for Git at
kernel.org:
- SmallProjectIdeas (and the respective discussion on the mailing list)
- Wishlist
- Janitor
Note: some of these pages may not have been updated recently, so it’s good to check if the issue isn’t solved yet, before trying to do it.
7) Some Extra Tips ↩
- Sometimes we get a little lost in Git’s technical terms. A good friend in
these moments is
man gitglossary! - Following the same idea of the previous item, there’s
man gitrepository-layout. It is very handy to better understand the structure of a Git repository.
8) Extra References ↩
Although this post didn’t end up so short, it certainly doesn’t cover all aspects of the contributing process. So here are some great extra readings:
- Introduction to Git - talk by Scott Chacon
- Pro Git - book by Scott Chacon and Ben Straub
- Section 10, Git Internals, is a spectacular reading for those wishing to know more about objects, references, packfile format, etc.
- Understanding Git — Index - post by Zvonimir Spajic
- Git for Computer Scientists - post by Tv
- Git docs, especially:
- Glossary: explain many technical words.
- Workflows: describe the workflows used at git.git.
- Revisions: an explanation of the extended SHA-1 syntax.
- Repository layout: the structure of repositories created through Git.
- MyFirstContribution: a great tutorial on the contributing process.
- SubmittingPatches: a must-read for everyone who wants to contribute to Git.
- Other doc files, not present online, such as
Documentation/CodingGuidelinesandDocumentation/technical/*
Tip: I recommend you to read, at least SubmittingPatches,
CodingGuidelines and MyFirstContribution while working on your first patch.
That’s it for this post! I hope to see you soon in the mailing list and IRC :) (BTW, you can find me as “matheustavares” there).
Contribute to this post :)
If you find any problem with this post and/or want to propose improvements, please, feel free to create an issue or submit a merge request here.
Til next time,
Matheus